In the evolving landscape of software development, API automation testing is no longer a luxury it’s a necessity. Whether you’re validating microservices or ensuring robust communication between front-end and back-end, mastering tools like Postman and Newman can significantly enhance your testing workflow.
In this blog post, you’ll learn how to set up API automation with Postman, use Newman to run collections from the command line, and ultimately integrate your tests into a CI/CD pipeline a complete step-by-step guide from local setup to enterprise-scale automation.
Perfect for QA Engineers, Automation Enthusiasts, and Testing Managers looking to modernize their API testing approach and seamlessly integrate quality into the development lifecycle.
What is API Automation Testing with Postman?
API Automation Testing is the process of using software to send calls to an API, get responses, and validate whether the API is behaving as expected, without involving a graphical user interface (GUI). It ensures that services communicate correctly, business logic is intact, and edge cases are handled gracefully.
Also Read: Getting Started with Kane AI: How to Automate Test Cases Without Writing Code
Why Postman?
Postman is one of the most widely used tools for API testing because of its:
- User-friendly interface
- Support for scripting and test automation
- Collection and environment management
- Ease of integration with automation tools (via Newman)
Even those with minimal coding experience can write powerful API tests using Postman’s intuitive features and JavaScript-based scripting.
Why Postman & Newman for API Automation?
Before we dive in, let’s address why these tools are so popular in the QA space:
- Postman is a powerful GUI-based tool that allows easy API test creation, documentation, and sharing.
- Newman is Postman’s command-line companion — perfect for running your Postman collections in automation pipelines like Jenkins, GitHub Actions, or Azure DevOps.
This combination bridges the gap between the simplicity of manual testing and CI/CD readiness.
Also Read: Using AI to Improve Test Coverage and Efficiency in Large Projects
How to Perform API Automation Testing Using Postman
Whether you’re a beginner or transitioning from manual API testing to automation, Postman provides a clean and structured approach to get started. Below is a detailed step-by-step guide to help you automate your API tests effectively.
Step 1: Install and Set Up Postman
- Download Postman from the official website: https://www.postman.com/downloads/
- Install and open the app.
- Sign up or log in to your Postman account for syncing and sharing capabilities.
Step 2: Create a Workspace and Collection
- Click on “Workspaces” → Create a new workspace (e.g.QA_Automation_API).
- Inside your workspace, click “New” → “Collection”.
- Name your collection (e.g., User_Authentication_Tests).
- This collection will hold a group of related API test cases.
Step 3: Add an API Request to the Collection
- Click “Add Request” in your collection.
- Fill in the required details:
- Method: GET, POST, PUT, DELETE, etc.
- URL: e.g., https://api.example.com/login
- Headers: Add required headers (e.g., Content-Type: application/json)
- Body: For POST/PUT requests, select raw and enter the request payload in JSON format.
Example:
{ "username": "john.doe", "password": "secure123" }Step 4: Write Test Scripts in the “Tests” Tab
This is where automation comes in.
Click on the “Tests” tab of the request and add JavaScript assertions
pm.test("Status code is 200", function () {
    pm.response.to.have.status(200);
});
pm.test("Response time is less than 500ms", function () {
    pm.expect(pm.response.responseTime).to.be.below(500);
});
pm.test("Body contains token", function () {
    var jsonData = pm.response.json();
    pm.expect(jsonData).to.have.property("token");
});
These test cases will automatically execute when the request is sent.
Step 5: Use Environment and Global Variables
Use environments to switch between different base URLs (Dev, QA, Prod):
- Create a new environment (e.g., QA).
- Add variables like:
- baseUrl: https://api.qa.example.com
- authToken: {{authToken}}
In your request, replace the static value with:
- bash
- CopyEdit
- {{baseUrl}}/login
This allows easy test execution across multiple environments.
Step 6: Chain Requests Using Scripts
You can store response values (like token, ID) and reuse them in subsequent requests:
// Store token in environment variable
var jsonData = pm.response.json();
pm.environment.set("authToken", jsonData.token);
Use this in the header of the next request:
Authorization: Bearer {{authToken}}Step 7: Run Collections via Collection Runner
- Go to your Collection and click “Run”.
- Select the environment (if applicable).
- Configure the number of iterations, delay, or data file (for data-driven testing).
- Click “Run” to execute all requests in the collection.
- View the test results in a summary dashboard.
Also Read: Why Product-Based Companies Should Rely on External QA Services Over Internal QA Teams
Step-by-Step Guide: Running Postman Collections with Newman from the Command Line
Step 1: Install Node.js and NPM
Newman requires Node.js (which includes npm) to be installed on your system.
For Windows/macOS/Linux:
- Download and install from https://nodejs.org/
- Verify installation:
- bash
- CopyEdit
- node -v npm -v
Step 2: Install Newman Globally
Once Node.js is installed, run:
npm install -g newmanThis installs Newman globally so you can run it from anywhere in your terminal.
Step 3: Export Postman Collection and Environment Files
In Postman:
1. Go to your Collection → Click the three dots (⋮) → Click Export
- Choose Collection v2.1
2. Go to your Environment (e.g., QA or Staging) → Click the download/export icon
Save both .json files locally, such as:
- MyCollection.json
- QAEnvironment.json
Step 4: Run the Collection Using Newman
Open your terminal or command prompt and run:
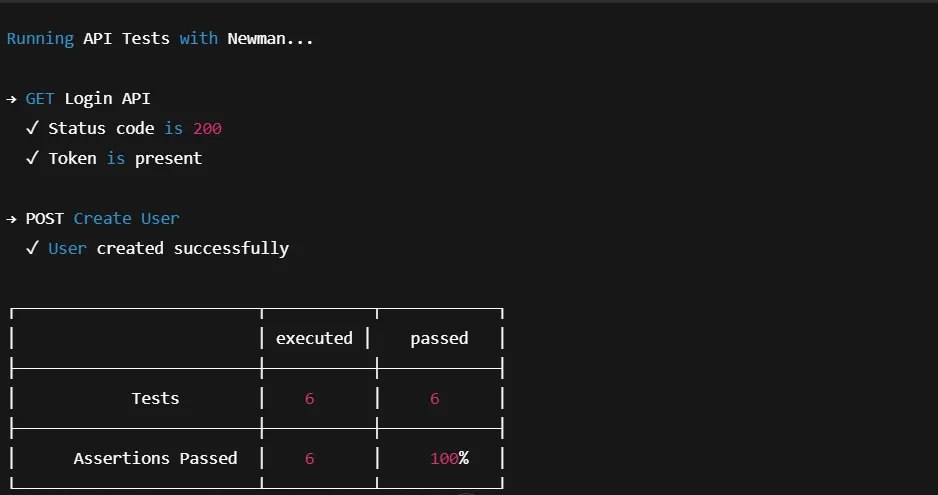
newman run MyCollection.json -e QAEnvironment.jsonExample Output:
→ Login API
GET https://api.example.com/login [200 OK, 321ms]
✓ Status code is 200
✓ Token is present in the response
→ Create User API
POST https://api.example.com/users [201 Created, 450ms]
✓ User created successfully
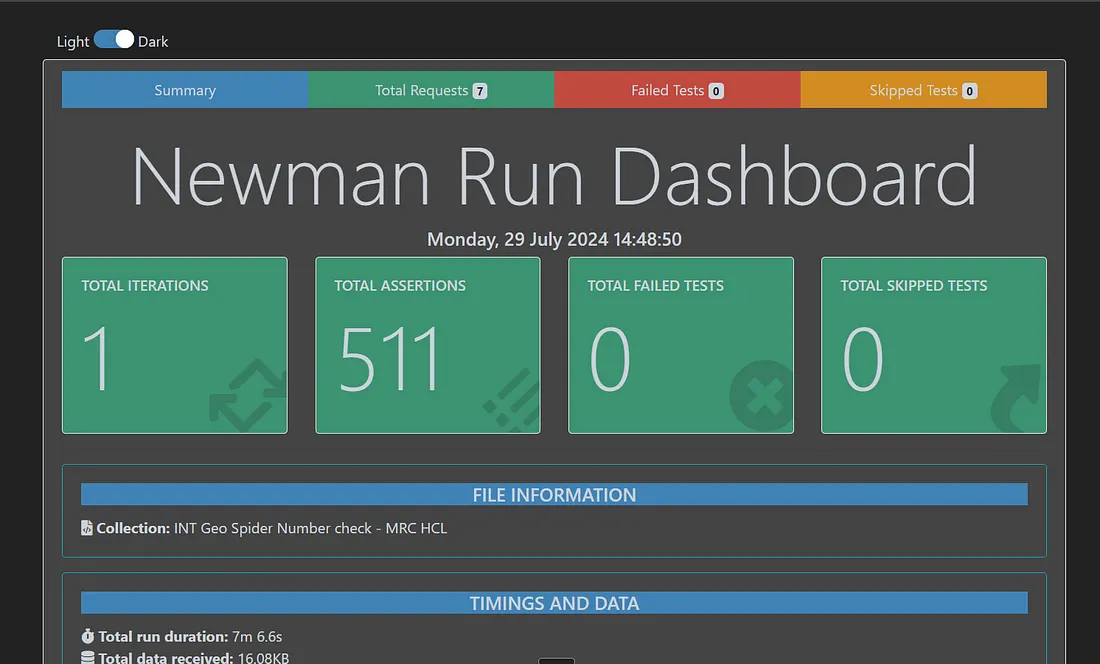
✔ 2 iterations completed.Step 5: Add HTML Report Generation (Optional)
To get a clean, visual test report:
newman run MyCollection.json -e QAEnvironment.json --reporters cli,html --reporter-html-export reports/report.htmlThe reports/report.html file will be generated and can be opened in any browser.
Step 6: Run with Data-Driven Testing
You can use a CSV or JSON file to run the same request with multiple data sets.
Example:
newman run MyCollection.json -e QAEnvironment.json --iteration-data data.csvWhere data.csv contains:
username,password
test1@example.com,pass123
test2@example.com,pass456
Each row will be used in a separate iteration of the request.
Also Read: Using AI to Improve Test Coverage and Efficiency in Large Projects
Step-by-Step Guide: From Setup to CI/CD
Let’s walk through the entire process, from scratch.
Pre-requisites
Before you start, make sure the following are ready:
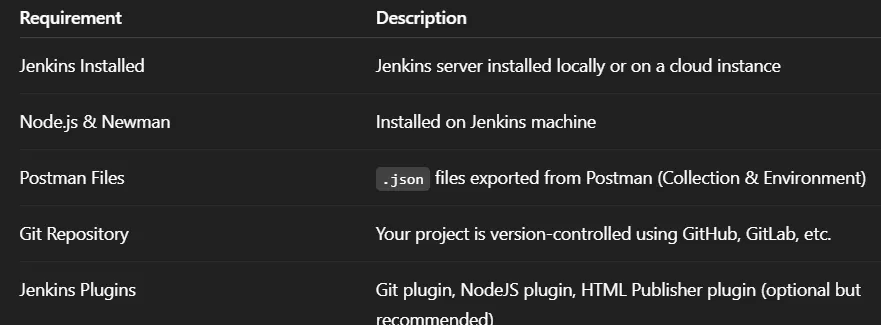
Step 1: Install Node.js and Newman on the Jenkins Machine
Time to make your API tests part of your delivery pipeline.
Jenkins Setup
1. Install Node.js:
- bash
- CopyEdit
- sudo apt update sudo apt install nodejs npm node -v npm -v
2. Install Newman globally:
- bash
- CopyEdit
- npm install -g newman
3. (Optional) Install the HTML reporter:
- bash
- CopyEdit
- npm install -g newman-reporter-html
Step 2: Configure Jenkins Job
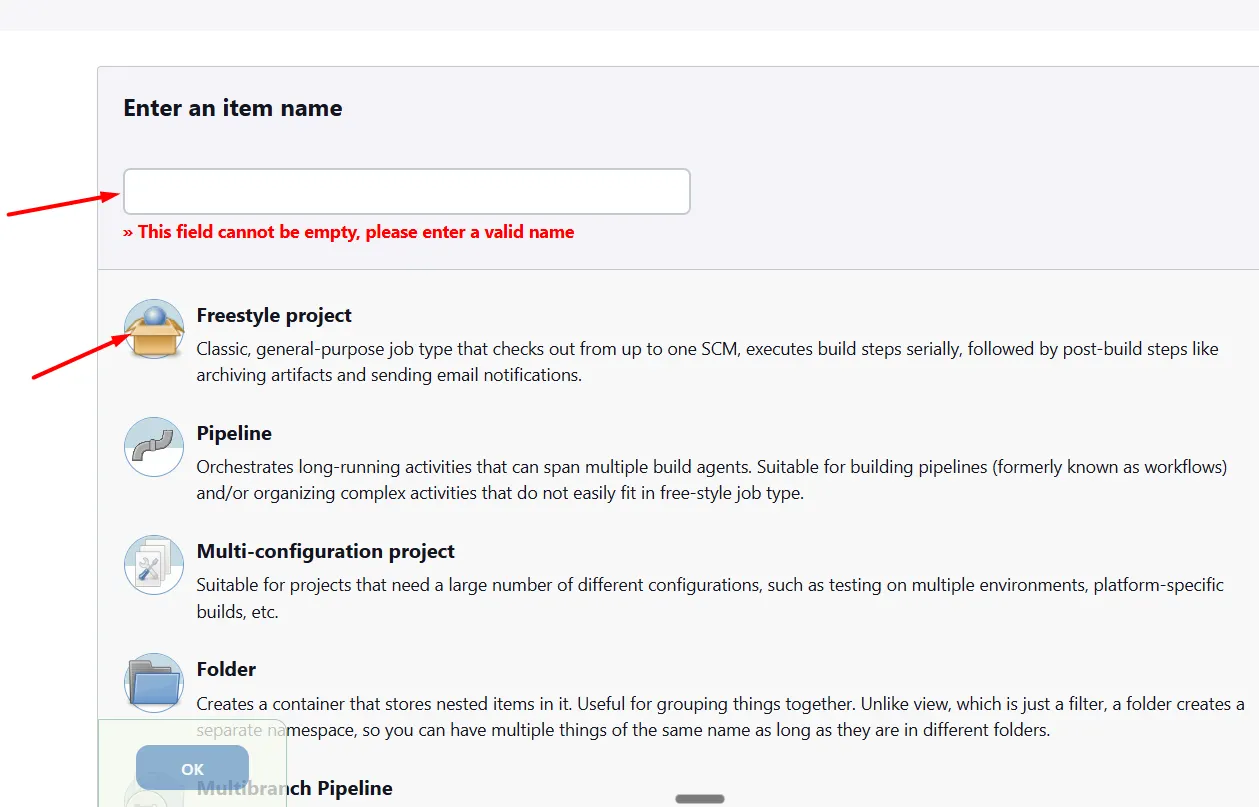
A. Create a New Freestyle Project
- Open Jenkins.
- Click New Item → Name it API-Newman-Tests → Select Freestyle project → OK.
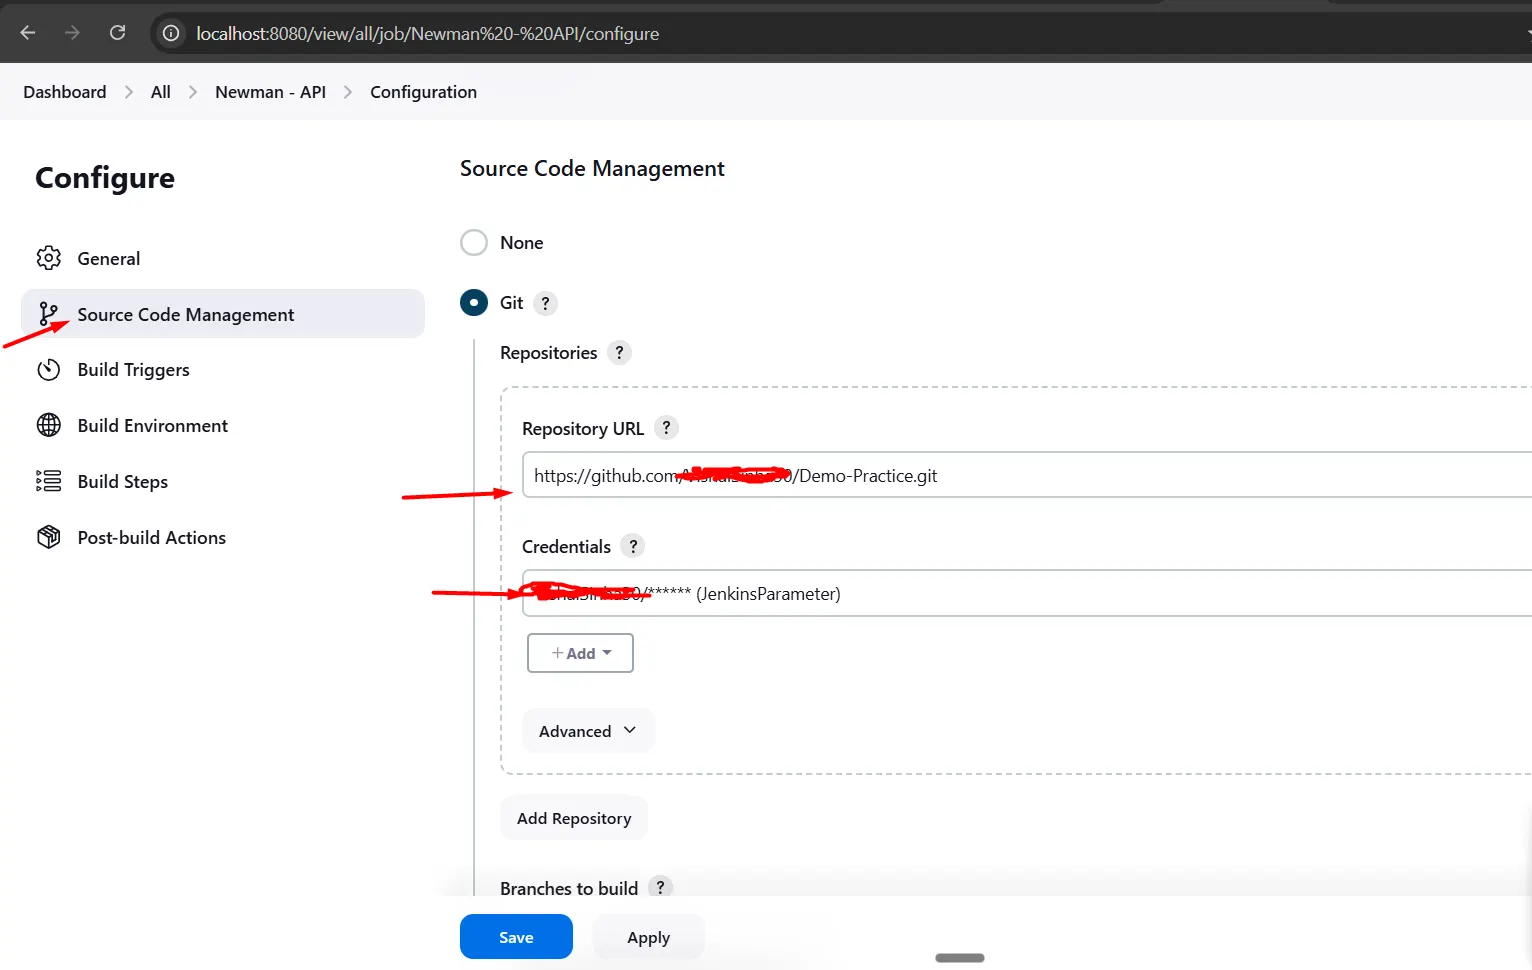
B. Configure Git Repository
- In Source Code Management, select Git.
- Add your Git repository URL and credentials if needed.
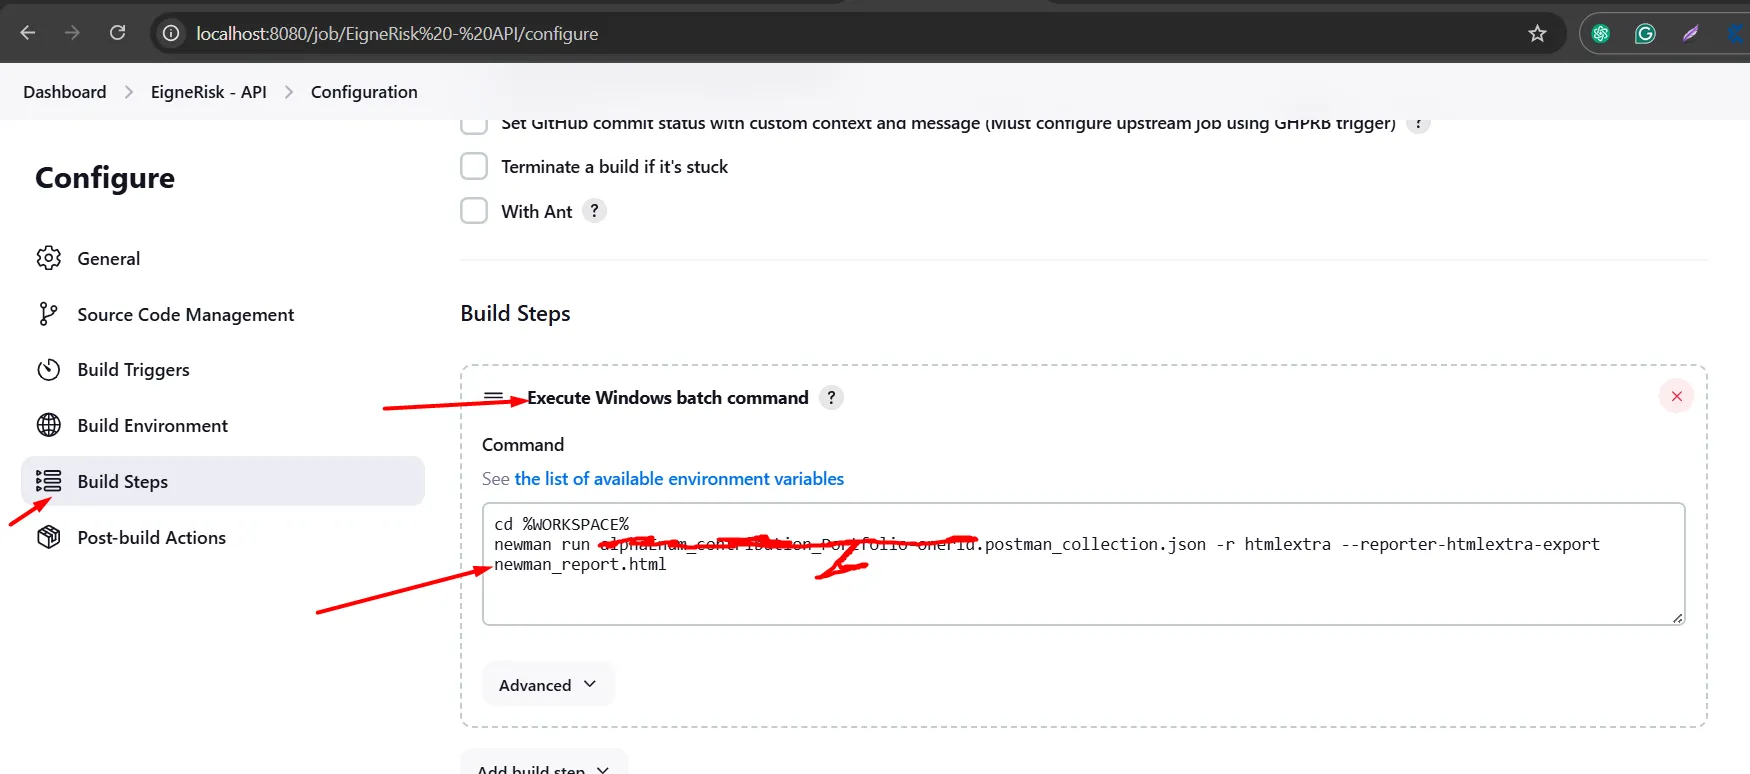
C. Add Build Step
- Under Build, click Add build step → Execute Shell (Linux/macOS) or Execute Windows batch command (Windows).
D. (Optional) Publish HTML Report
- Go to Post-build Actions → Add post-build action → Select Publish HTML reports.
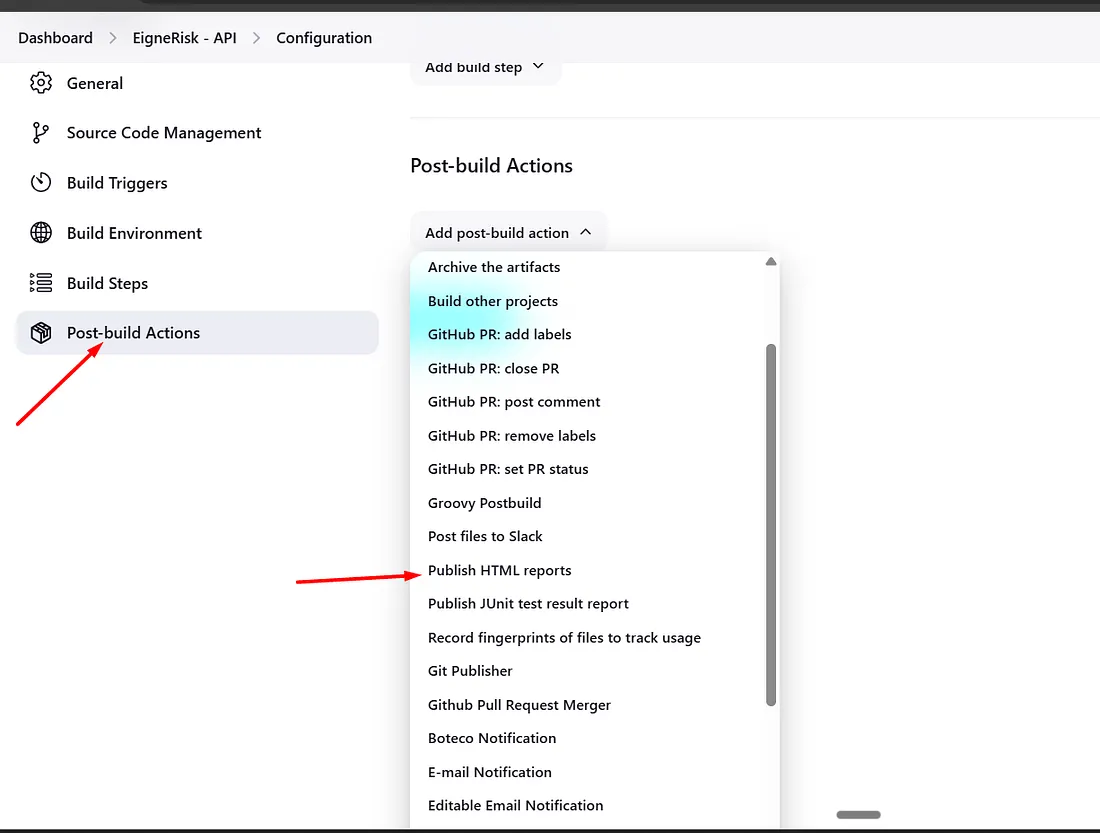
Configure:
- HTML directory to archive: reports
- Index page[s]: api-test-report.html
- Report title: API Test Report
This will allow you to view the test report directly from Jenkins after execution.
Step 3: Run Your Jenkins Job
Click Build Now.
You’ll see:
- Console output with Newman execution logs.
- A downloadable and viewable HTML test report (if configured).
- Build history and status indicators.
Sample Jenkins Console Output
Sample HTML Report
Also Read: Getting Started with Kane AI: How to Automate Test Cases Without Writing Code
Key Takeaways
- Postman is ideal for test case design, and Newman is perfect for execution.
- Your team can go from manual API testing to fully automated CI/CD in just a few steps.
- Combining this workflow with Jenkins or any CI tool builds confidence in your API stability.
- Automation = reduced regression time + quicker feedback = better releases.
Call to Action
If you found this guide useful:
- Share it with your QA team
- Subscribe to get more hands-on automation tips
- Comment below with your CI/CD use case or ask questions